Konfiguracja aplikacji Synappx Cloud Print obejmuje następujące procedury. Możesz pominąć konfigurację funkcji, z których nie zamierzasz korzystać.
Opcje przechowywania danych w chmurze
- OneDrive dla firm
- OneDrive
- SharePoint®
- Teams (wyłącznie użytkownicy Microsoft 365)
- Dropbox™
- Box™
- Google Drive™
- iCloud® i pamięć lokalna (skonfigurowane automatycznie na urządzeniach z systemem iOS)*
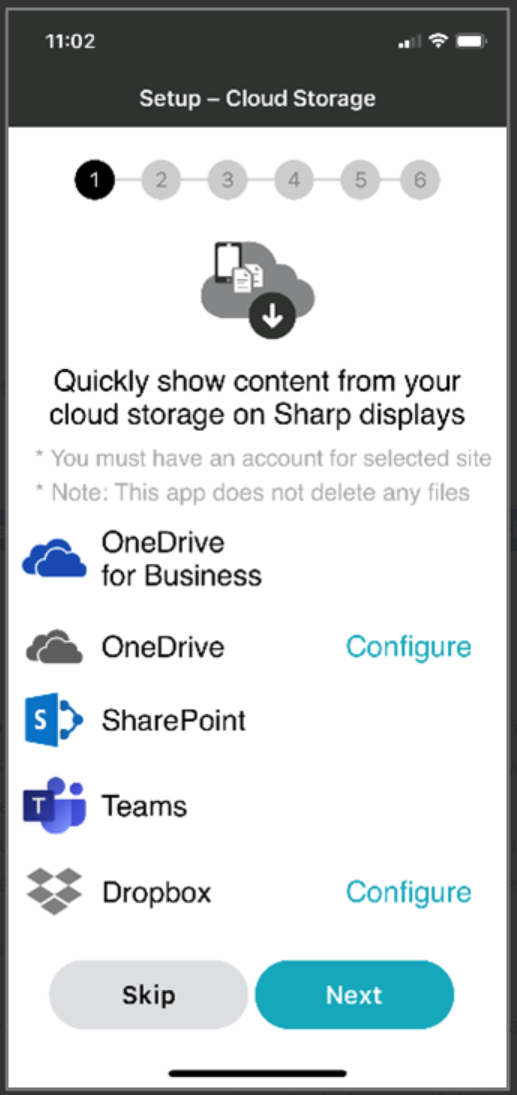
- Po wstępnym zalogowaniu pojawi się okno Setup – Cloud Storage (konfiguracja – przechowywanie danych w chmurze). Wybierz Configure to select your preferred (konfiguruj, aby wybrać preferowaną) usługę przechowywania danych w chmurze. (W poniższych przykładach wykorzystano Dropbox™.)
Uwagi:
- W przypadku użytkowników Microsoft 365 jednorazowe logowanie (SSO) do OneDrive dla firm, SharePoint i Teams oznacza, że miejsca przechowywania danych w chmurze firmy Microsoft są już dla Ciebie skonfigurowane.
- W przypadku użytkowników Google Workspace jednorazowe logowanie (SSO) do Google Drive jest już skonfigurowane przy użyciu tych samych danych identyfikacyjnych logowania, co podczas pierwszego logowania. Jeśli to konieczne, możesz zmienić konto Google Drive wybierając Edit (edytuj).
- Telefony iPhone automatycznie konfigurują iCloud i lokalną pamięć w celu skanowania i drukowania plików przechowywanych w chmurze.
- Logowanie do Microsoft Teams nie jest dostępne dla użytkowników Google Workspace, ponieważ wymaga użycia tych samych danych identyfikacyjnych logowania, które są wykorzystywane przy logowaniu do Synappx Cloud Print (dotyczy wyłącznie Microsoft 365).
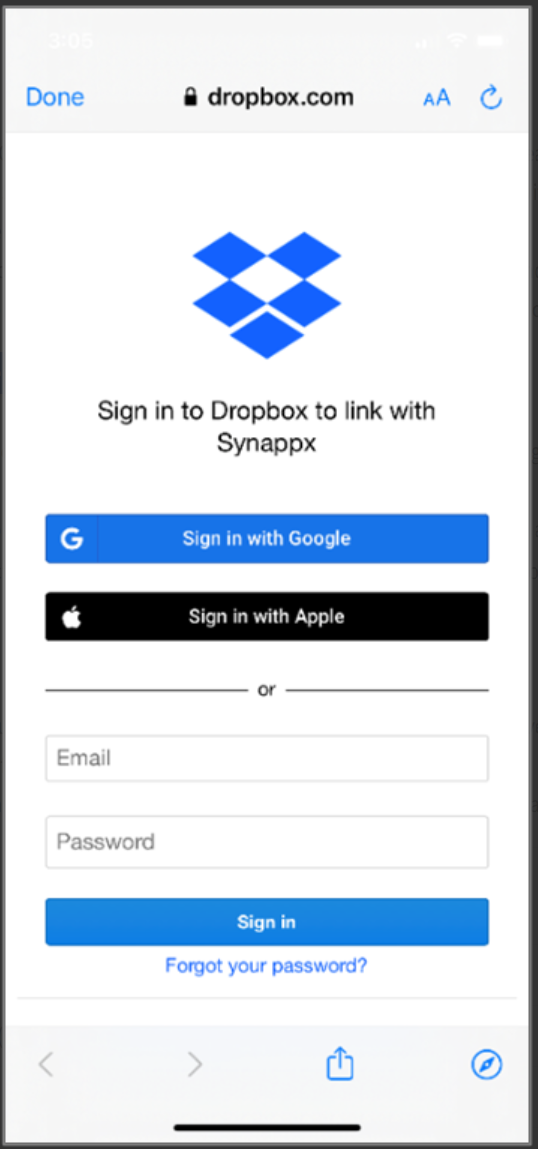
- Select sign-in method. Enter valid credentials and select Sign in [View Image] [View Image].
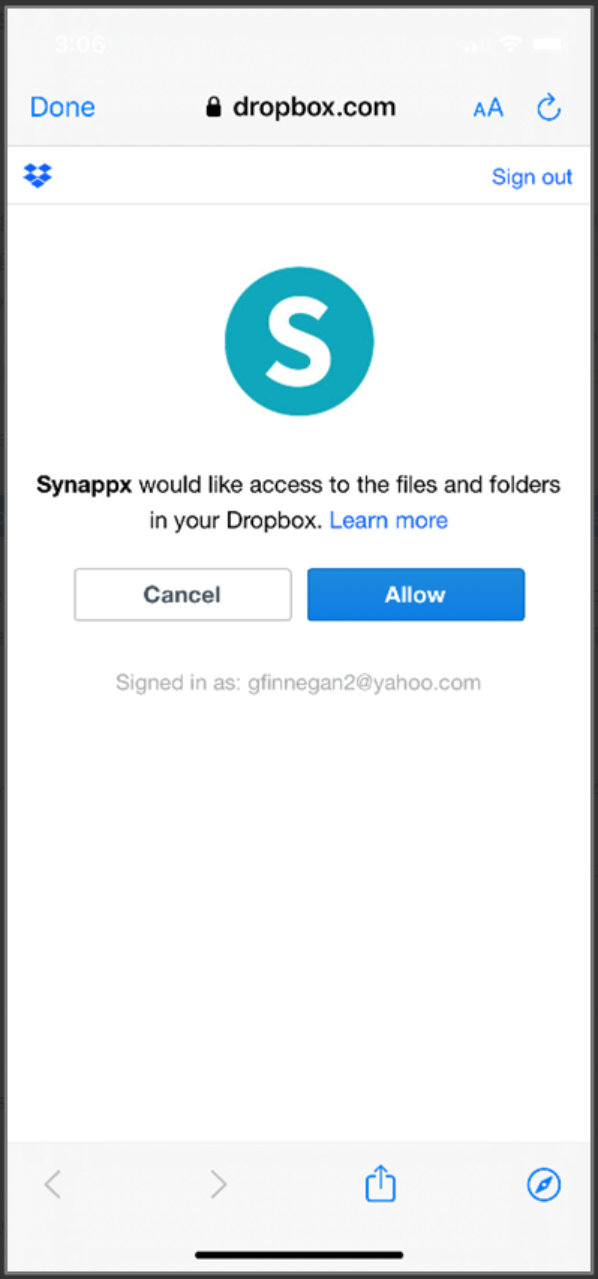
- A request will appear to allow the mobile app to access the files and folders in the cloud storage service. Select Allow [View Image].
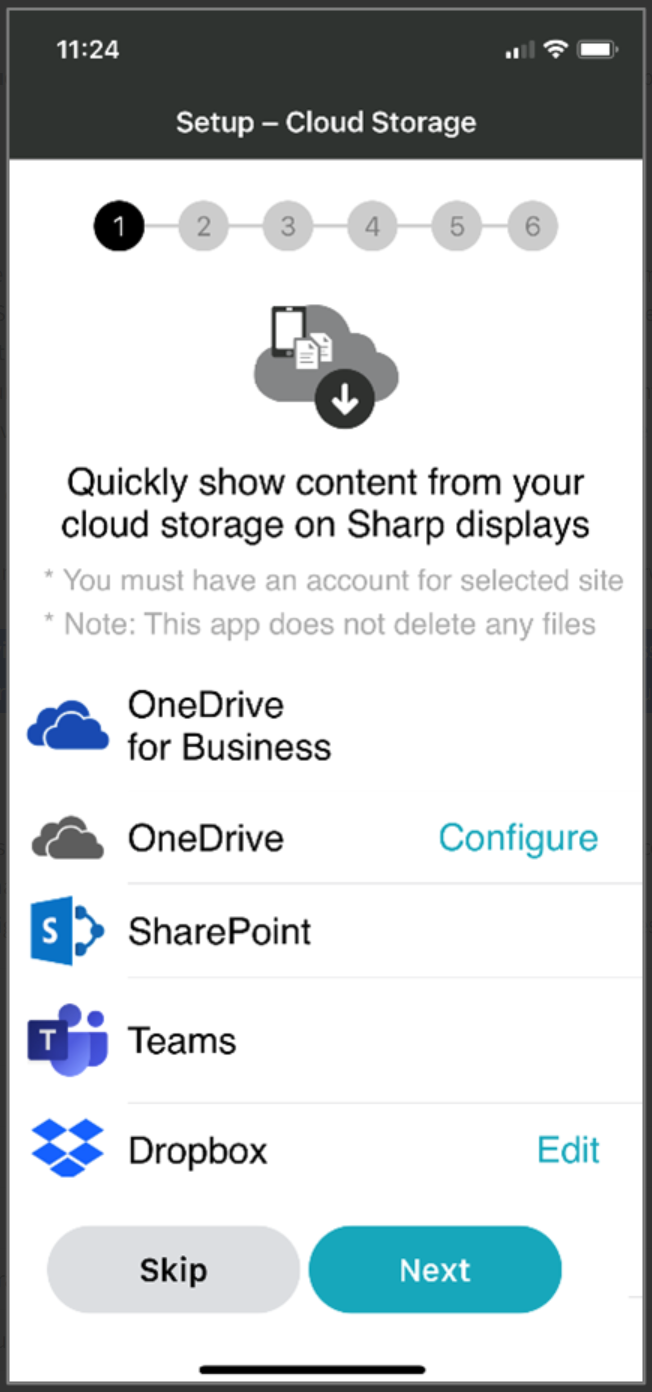
- The configured cloud storage service no longer appears grey and now includes an Edit link to access the service and change service settings. Repeat the previous steps to add another cloud storage service or select Next to proceed to the Scan and Print screen and continue setup [View Image].
![]](/sites/default/files/2024-11/image005.png)
Notes:
- Each cloud storage vendor has unique permissions that may differ from this example. Accept the permissions to use the Scan to Cloud Storage and Print Cloud file sharing features.
- Users cannot remove Single Sign On (SSO) cloud storage sites or iCloud and local storage as these are automatically configured on iOS devices.
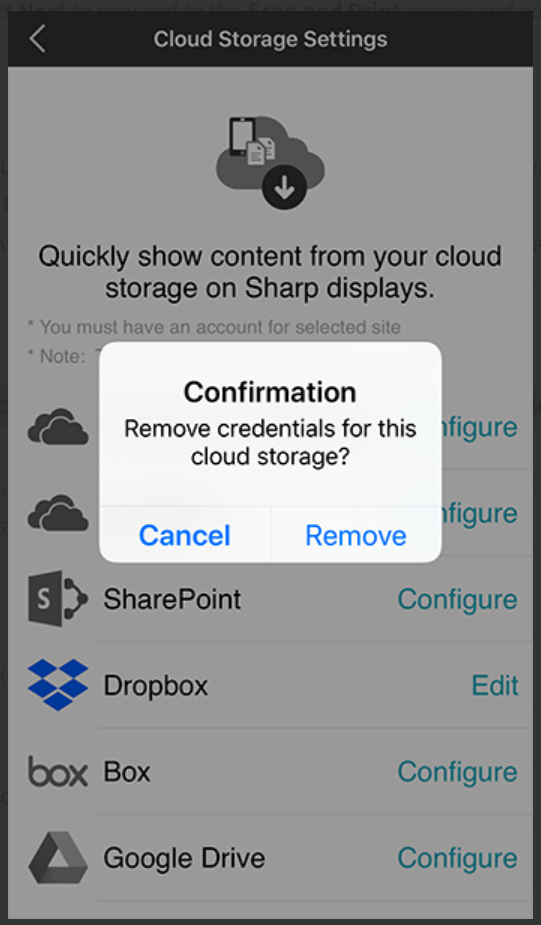
- To remove a configured cloud storage site, long press the cloud storage site name for several seconds. You will be asked if you want to remove credentials for the selected cloud site. Select Remove to delete the configuration for this cloud site [View Image].
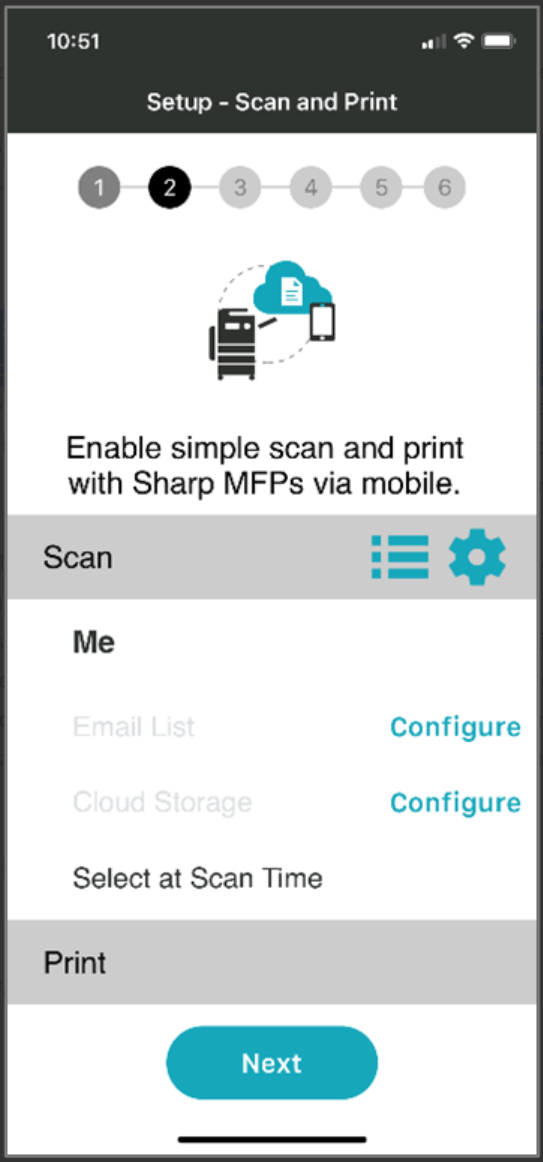
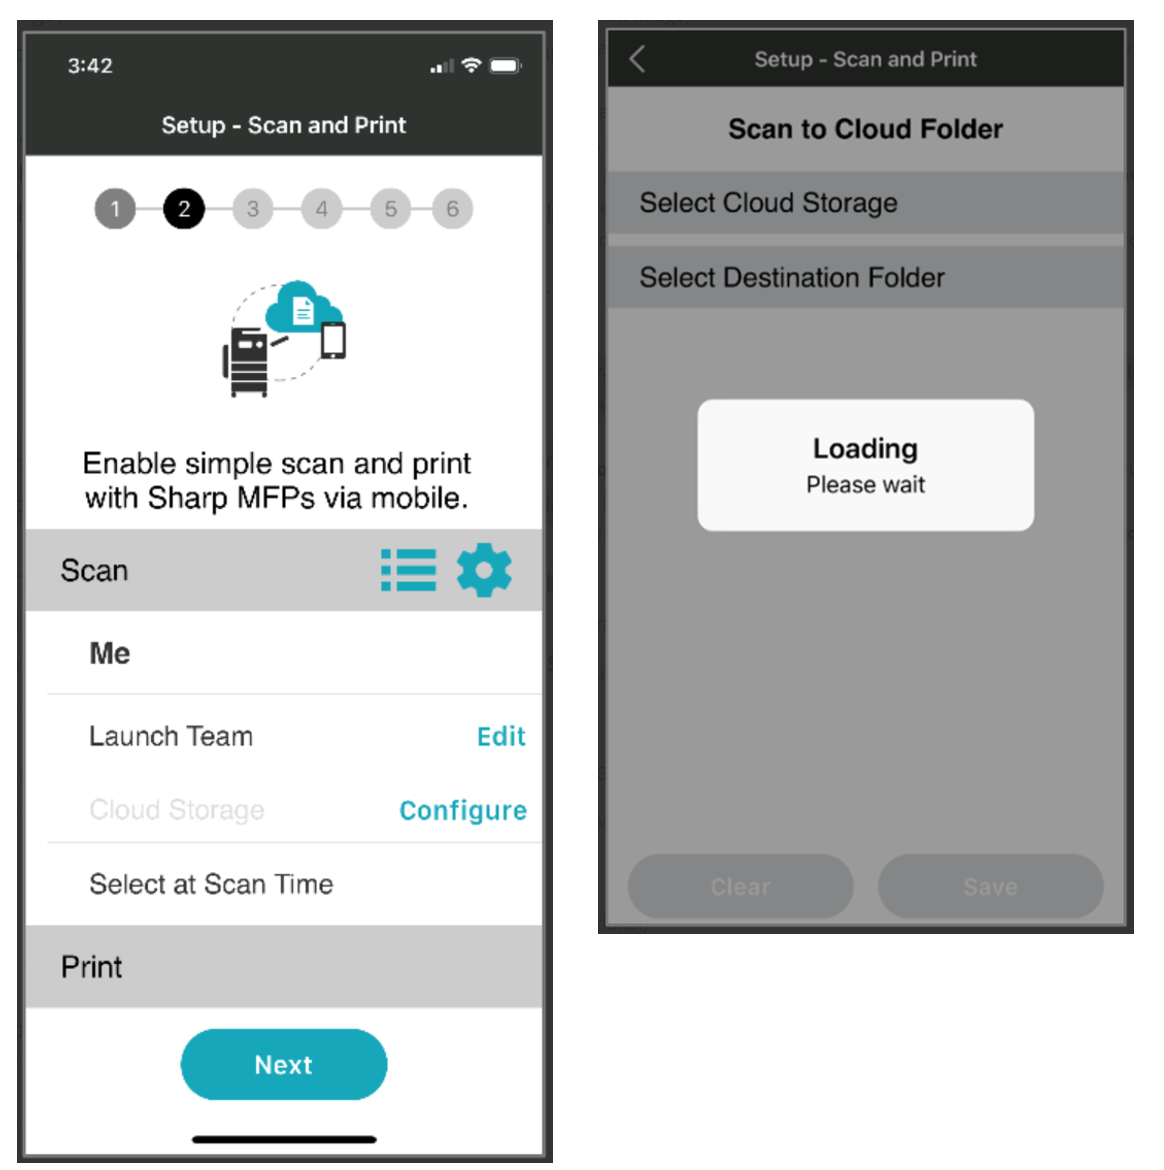
- After configuring cloud storage, the Setup - Scan and Print screen will display. Select Configure to set up an email distribution list (default is one list) or select Next if you do not want to set up an email distribution list. Email distribution lists can be created at any time from the Settings menu [View Image].
-
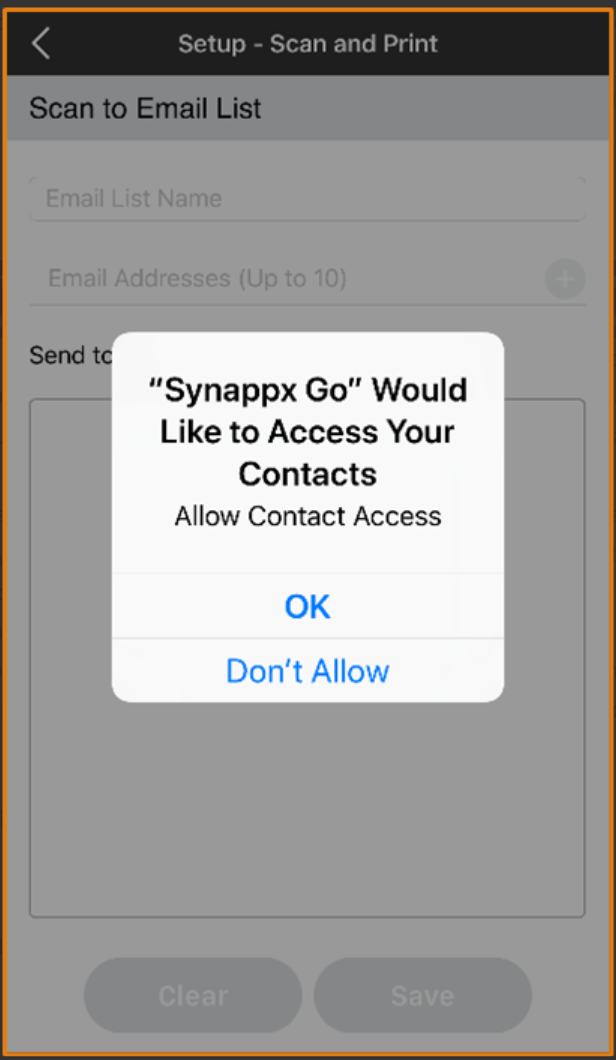
A request to access your mobile device contacts list will appear so you can easily create an email distribution list. For iOS phones, select OK if you want Synappx Cloud Print to access your contacts; select Don’t Allow if you do not want Synappx Cloud Print to access your contacts.
For Android phones, select Allow if you want Synappx Cloud Print to access your contacts; select Deny if you do not want Synappx Cloud Print to access your contacts. This permission can be changed at any time in the Settings menu [View Image] [View Image].
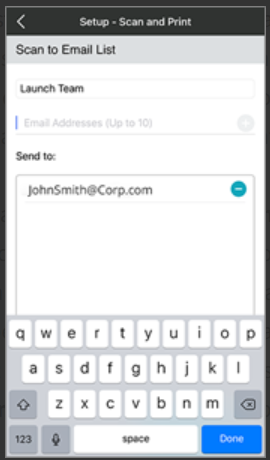
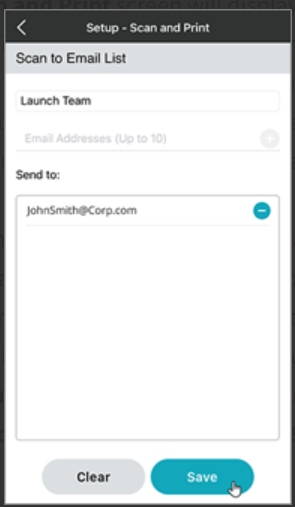
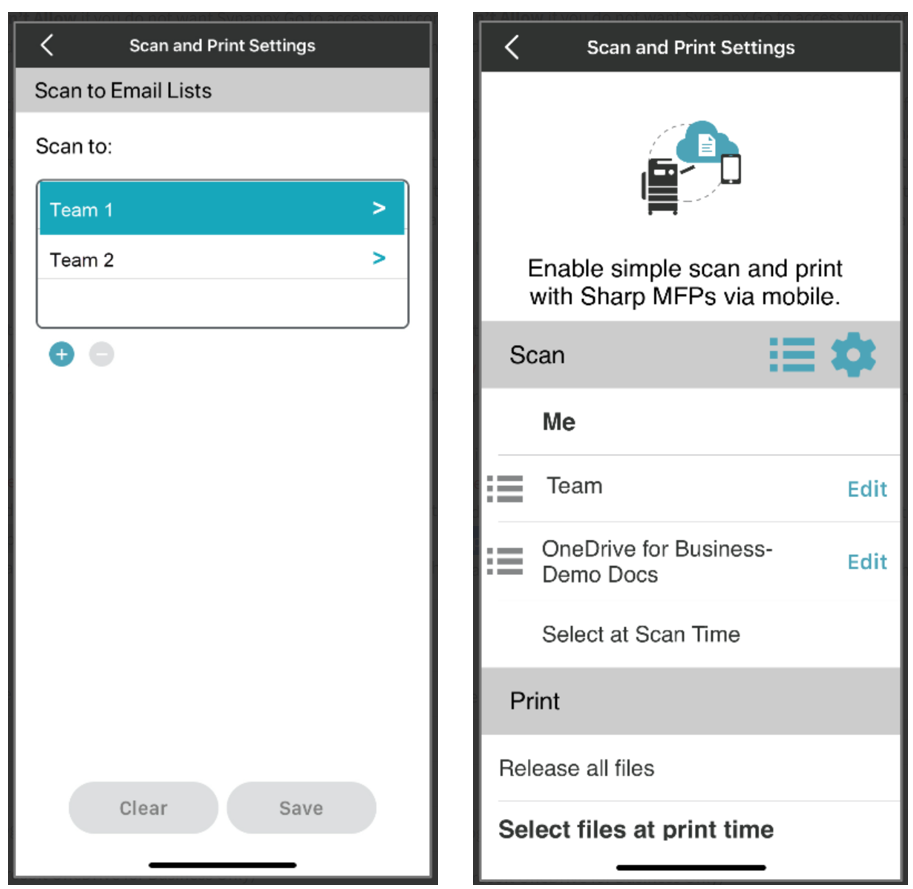
- Under Scan to Email List, type a title for your email distribution list in the Email List Name field.
- Type an email address or start typing a few characters of a contact name; mobile contacts that match that entry will populate. Select (+) to add a contact.
- Select (+) to add more email addresses. (A maximum of ten contacts can be added to the list.)
- Added contacts will appear in the Send to: area below. Select (-) to remove a contact. Once the list is complete, select Save to continue [View Image].
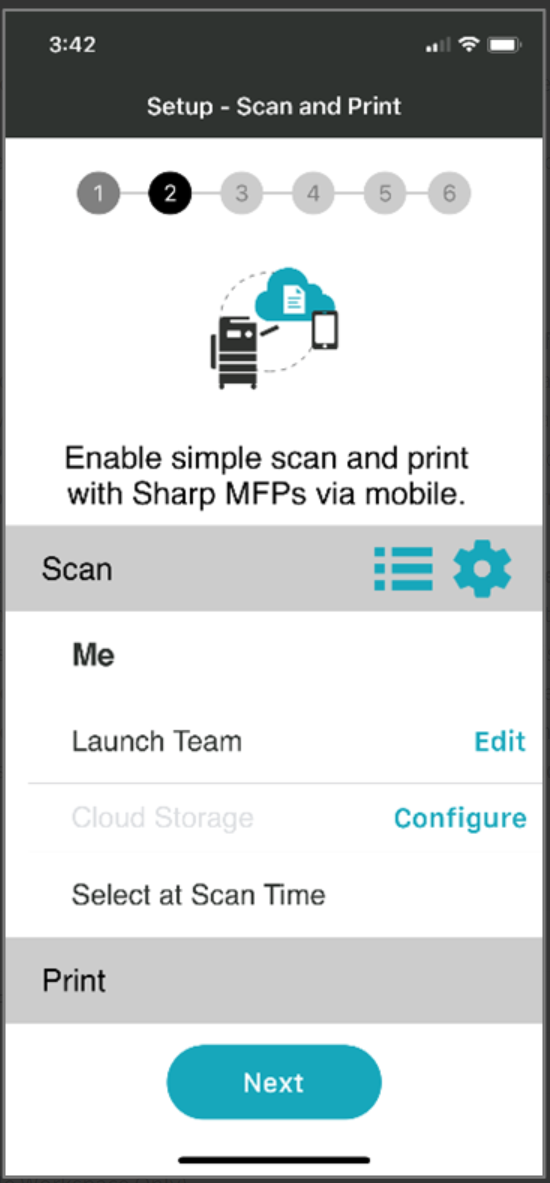
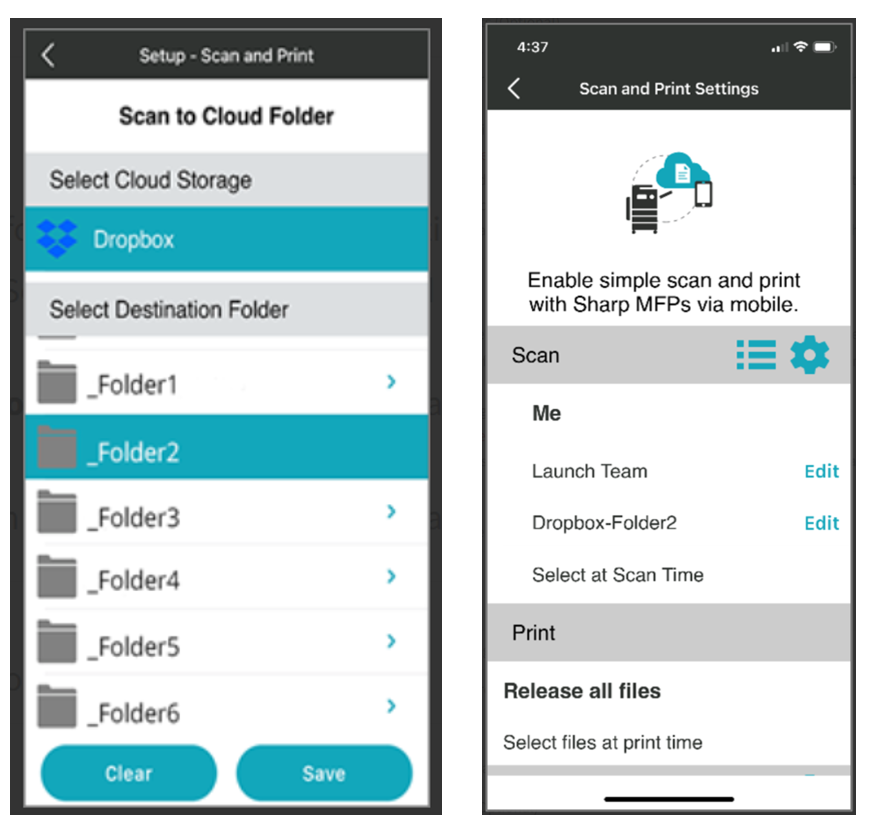
- The app will return to the Setup - Scan and Print screen. Your new email distribution list name will be shown as a scan destination. Select Edit to make additional changes to the email distribution list or select Configure to proceed to setup Scan to Cloud Folder [View Image].
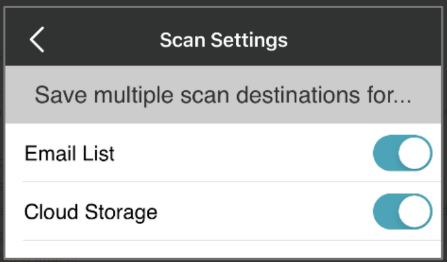
- Select the multi-select icon [View Image].
- Activate the multi-selection feature for Email List by toggling the switch so the teal colour shows. Select the back arrow < to return to the Setup – Scan and Print page [View Image].
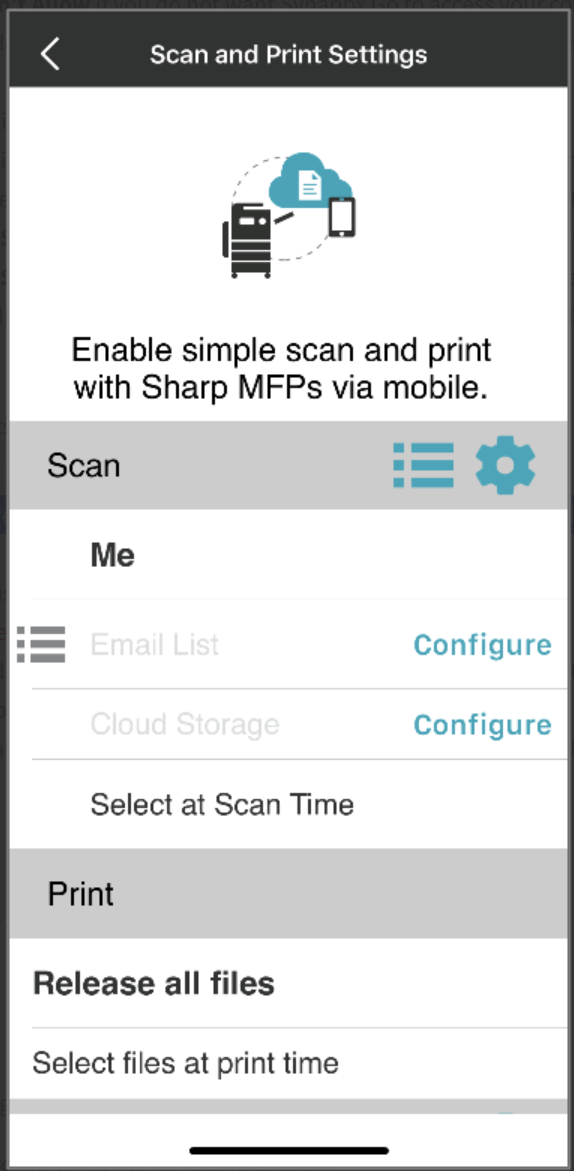
- Select Configure to set up email lists [View Image].
- Select + to add each email list [View Image].
- Enter a name for the email list and add email addresses by selecting +. When finished, select Save [View Image].
- Repeat this procedure for up to three email destinations.
- Highlight the default destination and select Save. You will be able to select the default or other destinations at scan time [View Image].
![View Image]](/sites/default/files/2024-11/Setup%20Scan%20to%20Cloud%20Storage%20%2812%29.png)
![[View Image]](/sites/default/files/2024-11/Setup%20Scan%20to%20Cloud%20Storage%20%2813%29.png)
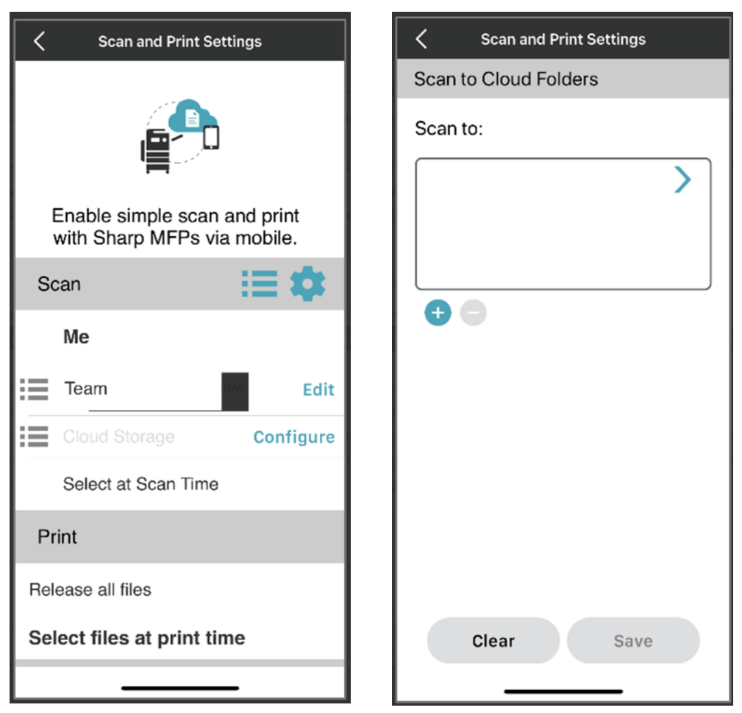
You can create up to three cloud storage destinations for scan jobs. The default setting is one preset cloud folder. To set up one default cloud storage folder, follow the steps below. To set up multiple cloud storage folders, go to Set Up Multiple Scan to Cloud Storage Folders.
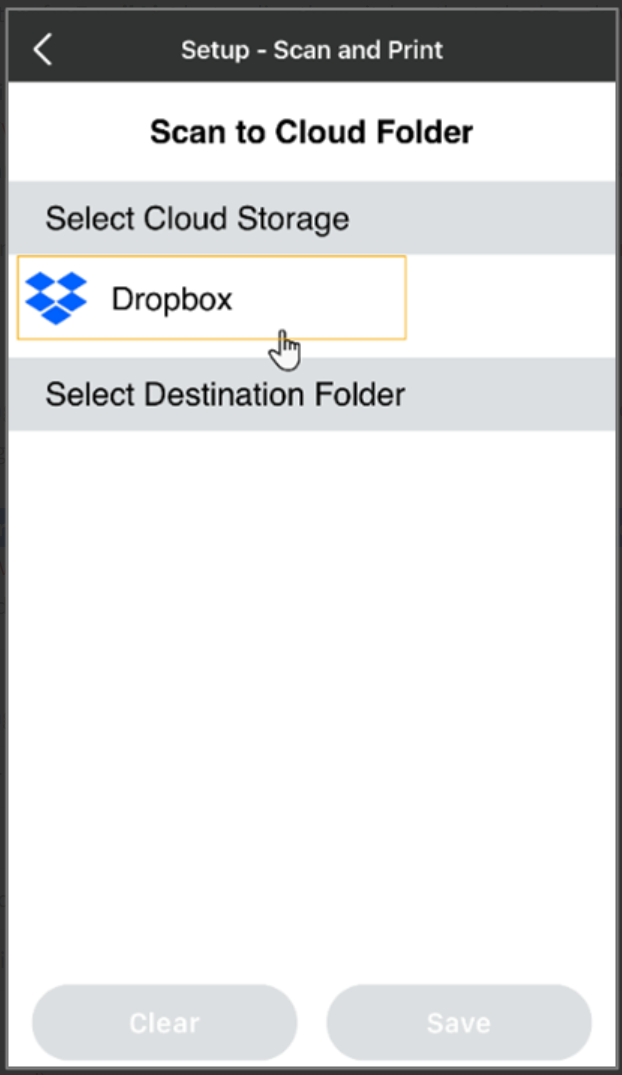
- Select Configure for Cloud Storage. The Scan to Cloud Folder screen will load all available cloud storage services [View Image].
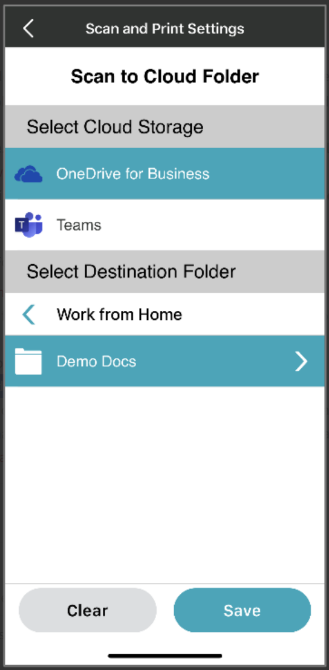
- Select a cloud storage service [View Image].
- Select a folder to use as a scan destination. Then select Save. The folder will appear as a Scan to Cloud Folder destination [View Image].
- Select the multi-select icon [View Image].
- Activate the multi-selection feature for Cloud Storage by toggling the switch so the teal colour shows. Select the back arrow < to return to the Setup – Scan and Print page [View Image].
- Select Configure to set up cloud storage destinations [View Image].
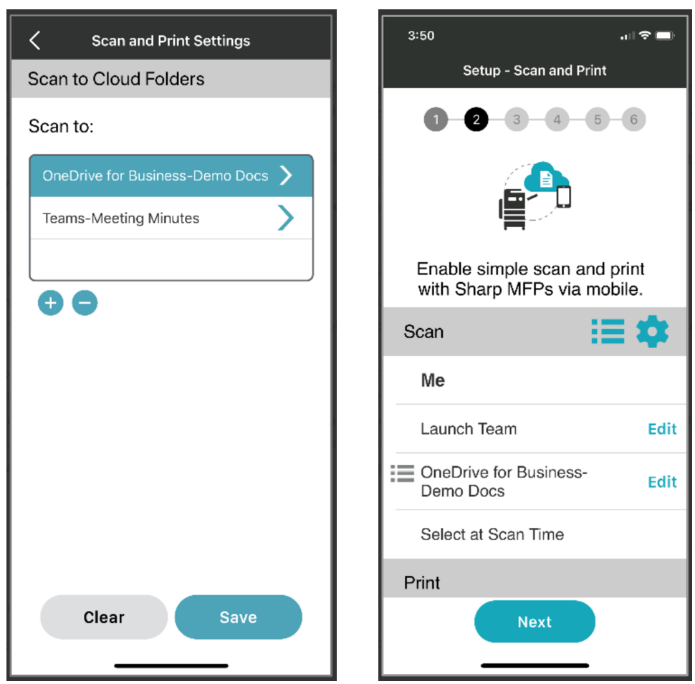
- Select + to add each cloud storage destination.
- Each configured cloud storage service will appear. Select a cloud site and choose a destination folder [View Image].
- Select + to add cloud storage destinations (up to three). Highlight the default destination and then select Save. You will be able to select the default or other destinations at scan time [View Image].